# Wordpress

* Login into your Wordpress website
* Go to Plugins > Add new plugin
* Search for: "Make Connector"
* Click on "Install now" and hit "Activate"
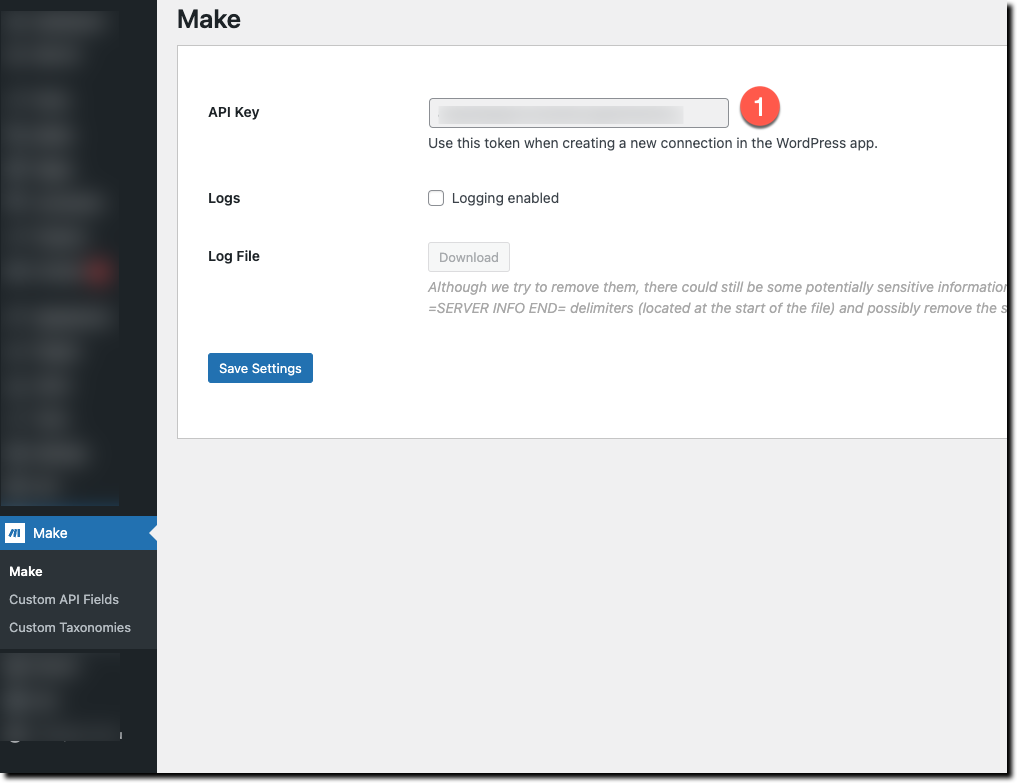
* Click on "Make" on the left side

<figure><img src="https://1783004979-files.gitbook.io/~/files/v0/b/gitbook-x-prod.appspot.com/o/spaces%2FIJXjOdH49mSgKizw5Kt5%2Fuploads%2F2hAylWSDlpT9GA6WoY1h%2Fimage.png?alt=media&#x26;token=a7c69e9e-d9dc-45f7-aaab-eba39fd6b19a" alt=""><figcaption></figcaption></figure>

* Copy the API key (1) and paste it into your connection customer settings of your Contentrocket portal:

<figure><img src="https://1783004979-files.gitbook.io/~/files/v0/b/gitbook-x-prod.appspot.com/o/spaces%2FIJXjOdH49mSgKizw5Kt5%2Fuploads%2Fsl61P0fuFhK3a0tPXyoR%2Fimage.png?alt=media&#x26;token=1899641d-3cc7-4bbb-b45e-6b63ae74e30b" alt=""><figcaption></figcaption></figure>

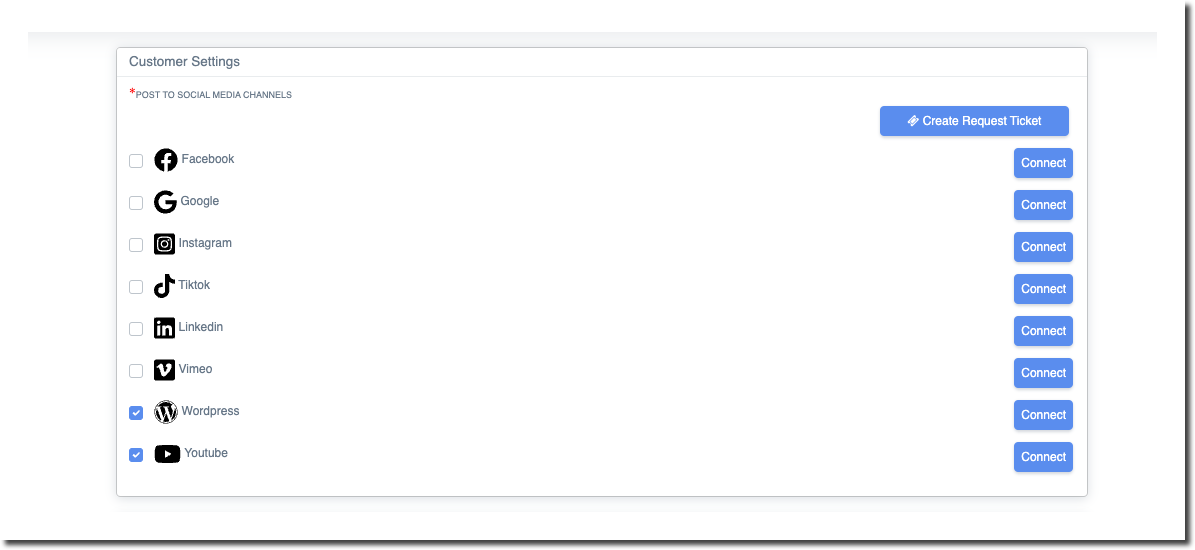
* Click on "Connect" for Wordpress
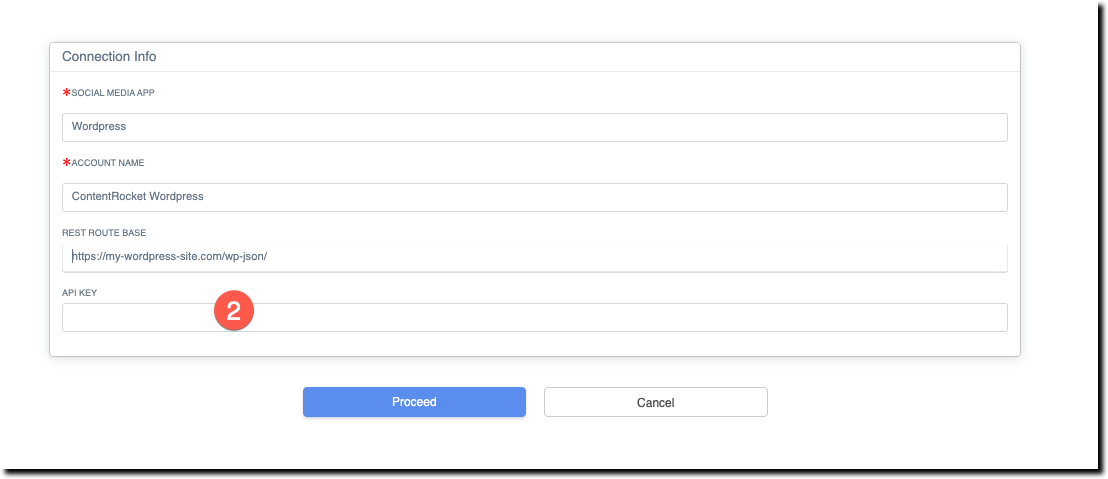
* Put the above API Key into the API key field (2):

<figure><img src="https://1783004979-files.gitbook.io/~/files/v0/b/gitbook-x-prod.appspot.com/o/spaces%2FIJXjOdH49mSgKizw5Kt5%2Fuploads%2FLZe6kWL9xQByddaYBWEM%2Fimage.png?alt=media&#x26;token=bb43263b-6602-49dc-a359-9ed64676c24b" alt=""><figcaption><p>Put the API key here</p></figcaption></figure>

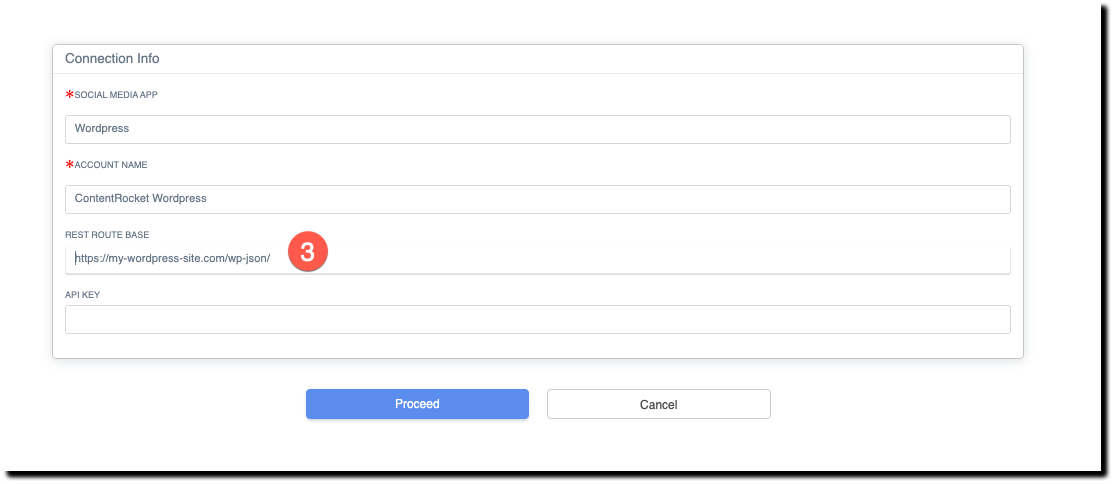
* Put the REST route Base pointing to your own hostname. Eg. <https://contentrocket.io/wp-json/>, see 3:

<figure><img src="https://1783004979-files.gitbook.io/~/files/v0/b/gitbook-x-prod.appspot.com/o/spaces%2FIJXjOdH49mSgKizw5Kt5%2Fuploads%2FP2gdhqGHTAUIrPnH8Nmz%2Fimage.png?alt=media&#x26;token=b0b90a48-80d7-4941-ac11-760ad91432fd" alt=""><figcaption><p>Put the REST Route base here</p></figcaption></figure>

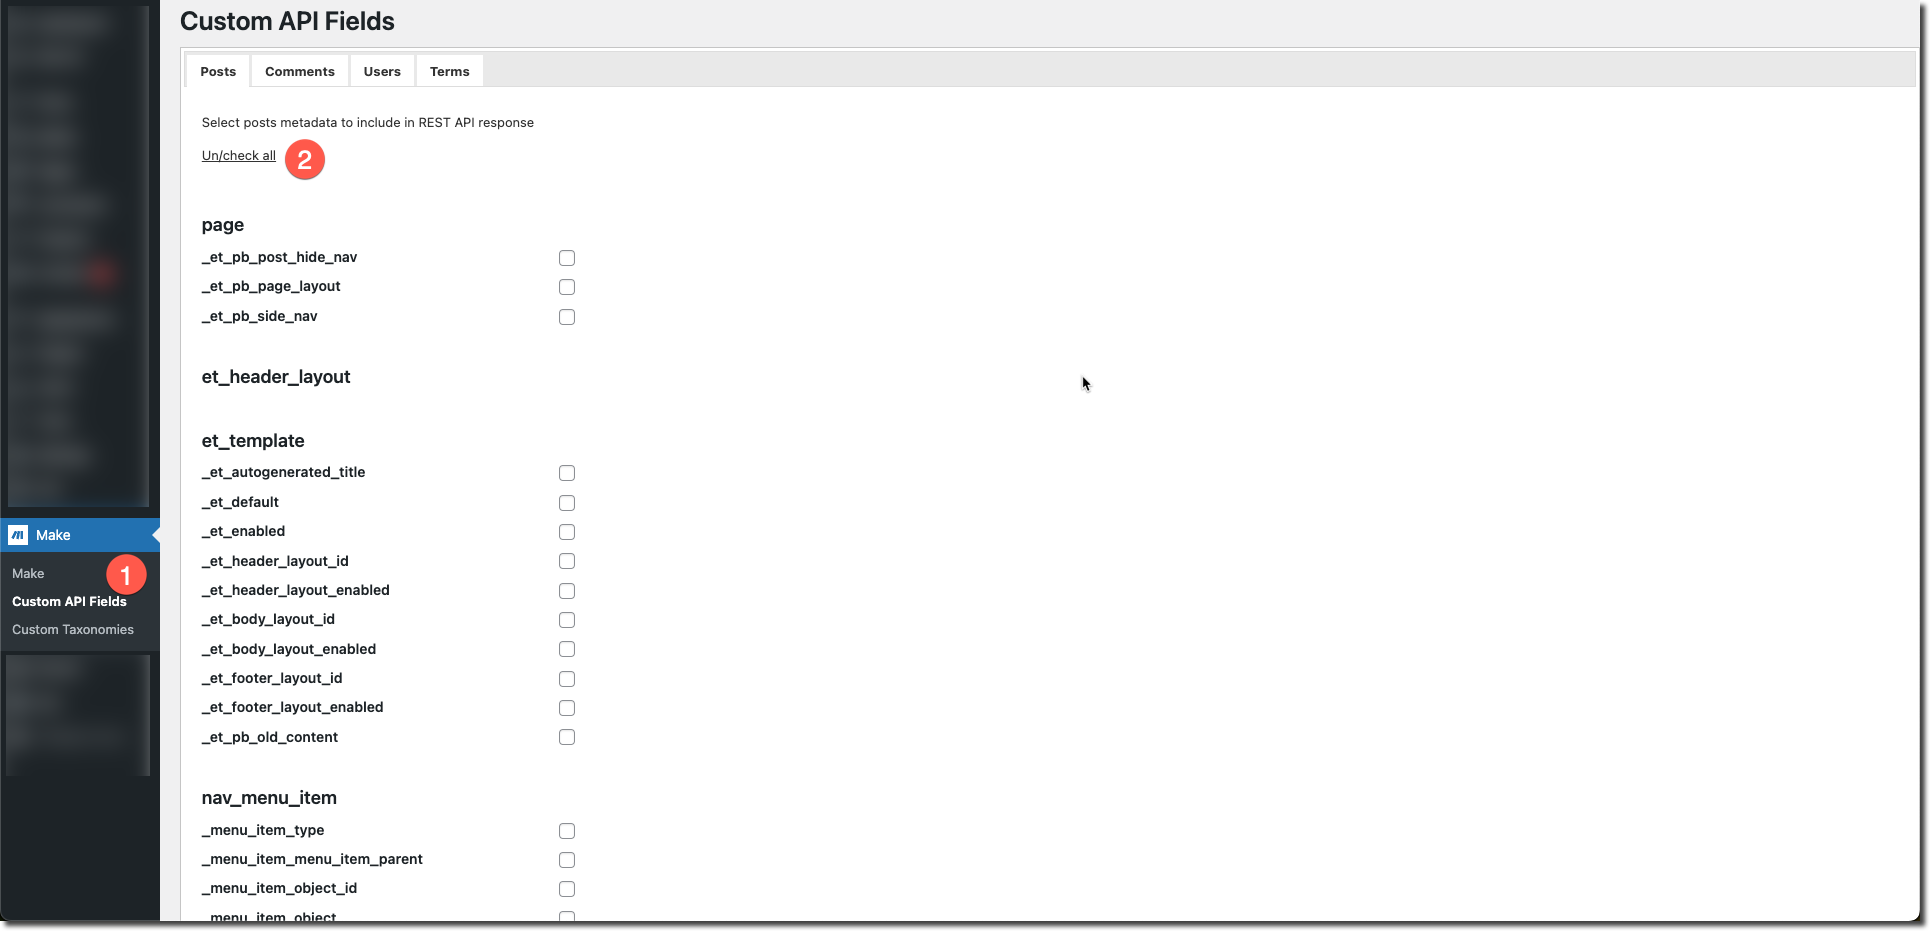
* To get full permission to write to your site, click on "Custom API fields" (1) and after that, click on "check all" (2) and click on the bottom on "Save settings"

<figure><img src="https://1783004979-files.gitbook.io/~/files/v0/b/gitbook-x-prod.appspot.com/o/spaces%2FIJXjOdH49mSgKizw5Kt5%2Fuploads%2F5OLyhMunO3We5tyQgbIl%2Fimage.png?alt=media&#x26;token=4d2fd01d-7fe6-4b37-b018-b6871b06ff41" alt=""><figcaption><p>Enable the custom API fields</p></figcaption></figure>

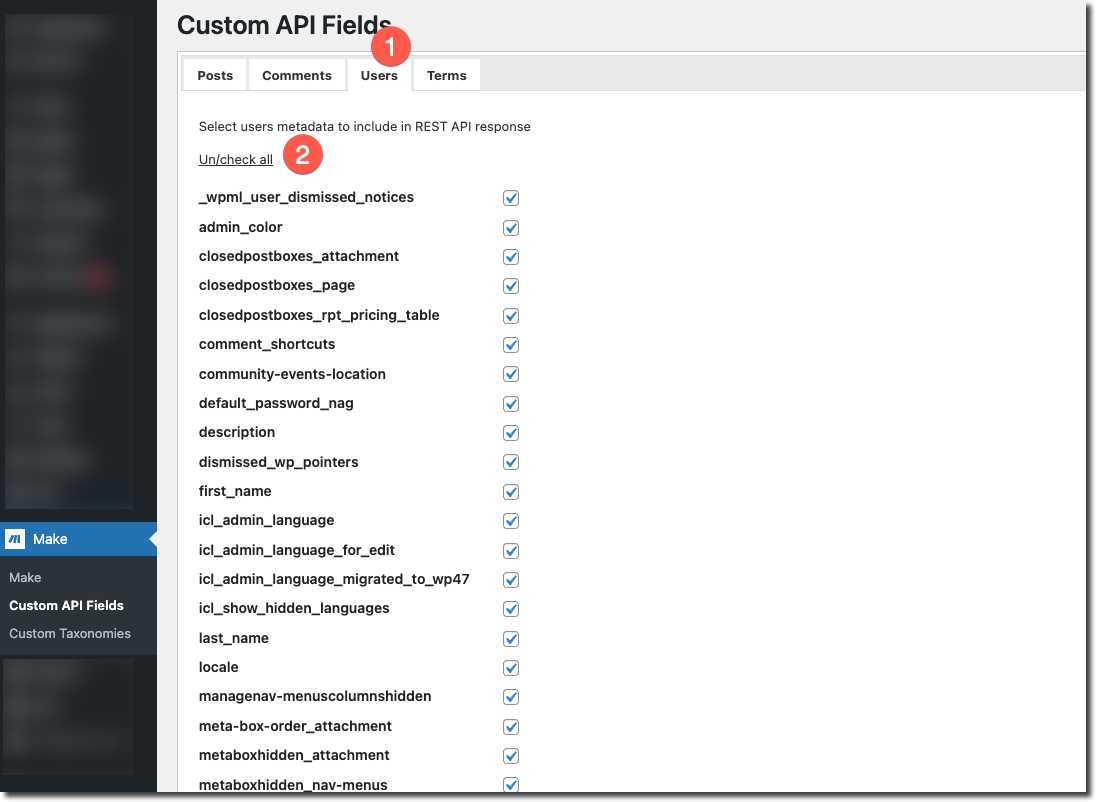
* Click on the tab "Users" (1), click on "check all" (2) and save the settings on the bottom

<figure><img src="https://1783004979-files.gitbook.io/~/files/v0/b/gitbook-x-prod.appspot.com/o/spaces%2FIJXjOdH49mSgKizw5Kt5%2Fuploads%2FKQlT4LluCyhdzILHvVll%2Fimage.png?alt=media&#x26;token=21f4faed-2e5a-4a31-9776-fc033bfda1c9" alt=""><figcaption><p>Check all on tab users</p></figcaption></figure>

### Installing the ACF Plugin

* Click on Plugins (1), and search for the "Advanced Custom Fields" (2) plugin, and click on "Install now"

<figure><img src="https://1783004979-files.gitbook.io/~/files/v0/b/gitbook-x-prod.appspot.com/o/spaces%2FIJXjOdH49mSgKizw5Kt5%2Fuploads%2F6QPIRSgb1QhEvQJhNDOp%2Fimage.png?alt=media&#x26;token=036caff3-5da3-4605-83db-303ffc17895c" alt=""><figcaption></figcaption></figure>

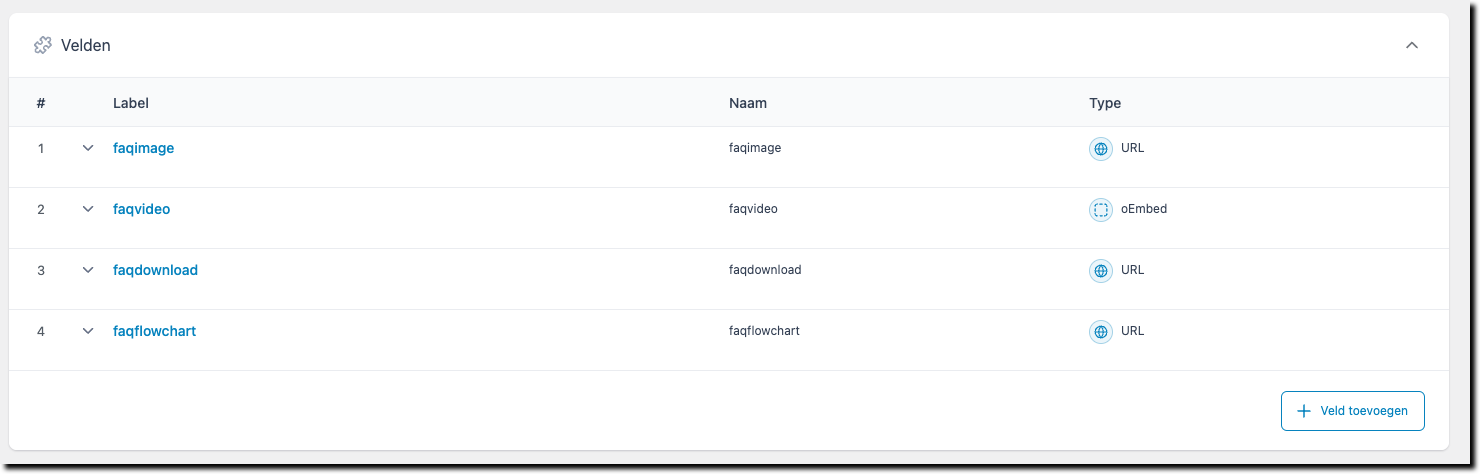
* Create a field group called e.g. "FAQ"
* Within this group, create the following 4 fields:

<figure><img src="https://1783004979-files.gitbook.io/~/files/v0/b/gitbook-x-prod.appspot.com/o/spaces%2FIJXjOdH49mSgKizw5Kt5%2Fuploads%2F9dyKgtFbWiw8PYz4M8aQ%2Fimage.png?alt=media&#x26;token=200b8bfe-91f5-4119-b89e-5b13852c6a08" alt=""><figcaption></figcaption></figure>

* Make sure you select "Post" in the ACF settings:

<figure><img src="https://1783004979-files.gitbook.io/~/files/v0/b/gitbook-x-prod.appspot.com/o/spaces%2FIJXjOdH49mSgKizw5Kt5%2Fuploads%2FsaPzgBcUGK602ktItjOG%2Fimage.png?alt=media&#x26;token=28a381b8-170f-4cbd-9266-9ed366f912be" alt=""><figcaption></figcaption></figure>

* Create your first post in Wordpress in try to fill the fields: Faqimage, faqdownload, faqvideo, faqflowchart with dummy fields, after this you can follow the step below.
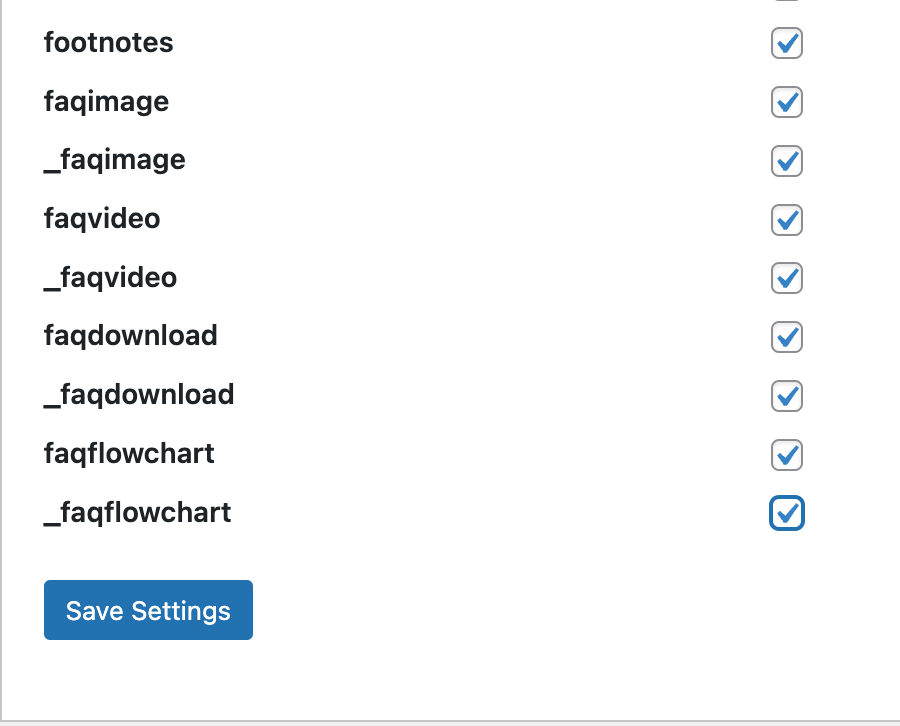
* Go back to the Make plugin and verify if the newly created fields of ACF are selected (tab "Custom API Fields", like this:

<figure><img src="https://1783004979-files.gitbook.io/~/files/v0/b/gitbook-x-prod.appspot.com/o/spaces%2FIJXjOdH49mSgKizw5Kt5%2Fuploads%2FFB9fVedc2wbOFc5he4Bb%2Fimage.png?alt=media&#x26;token=f473c450-58ab-4f25-9d46-49c7ead4c243" alt=""><figcaption></figcaption></figure>

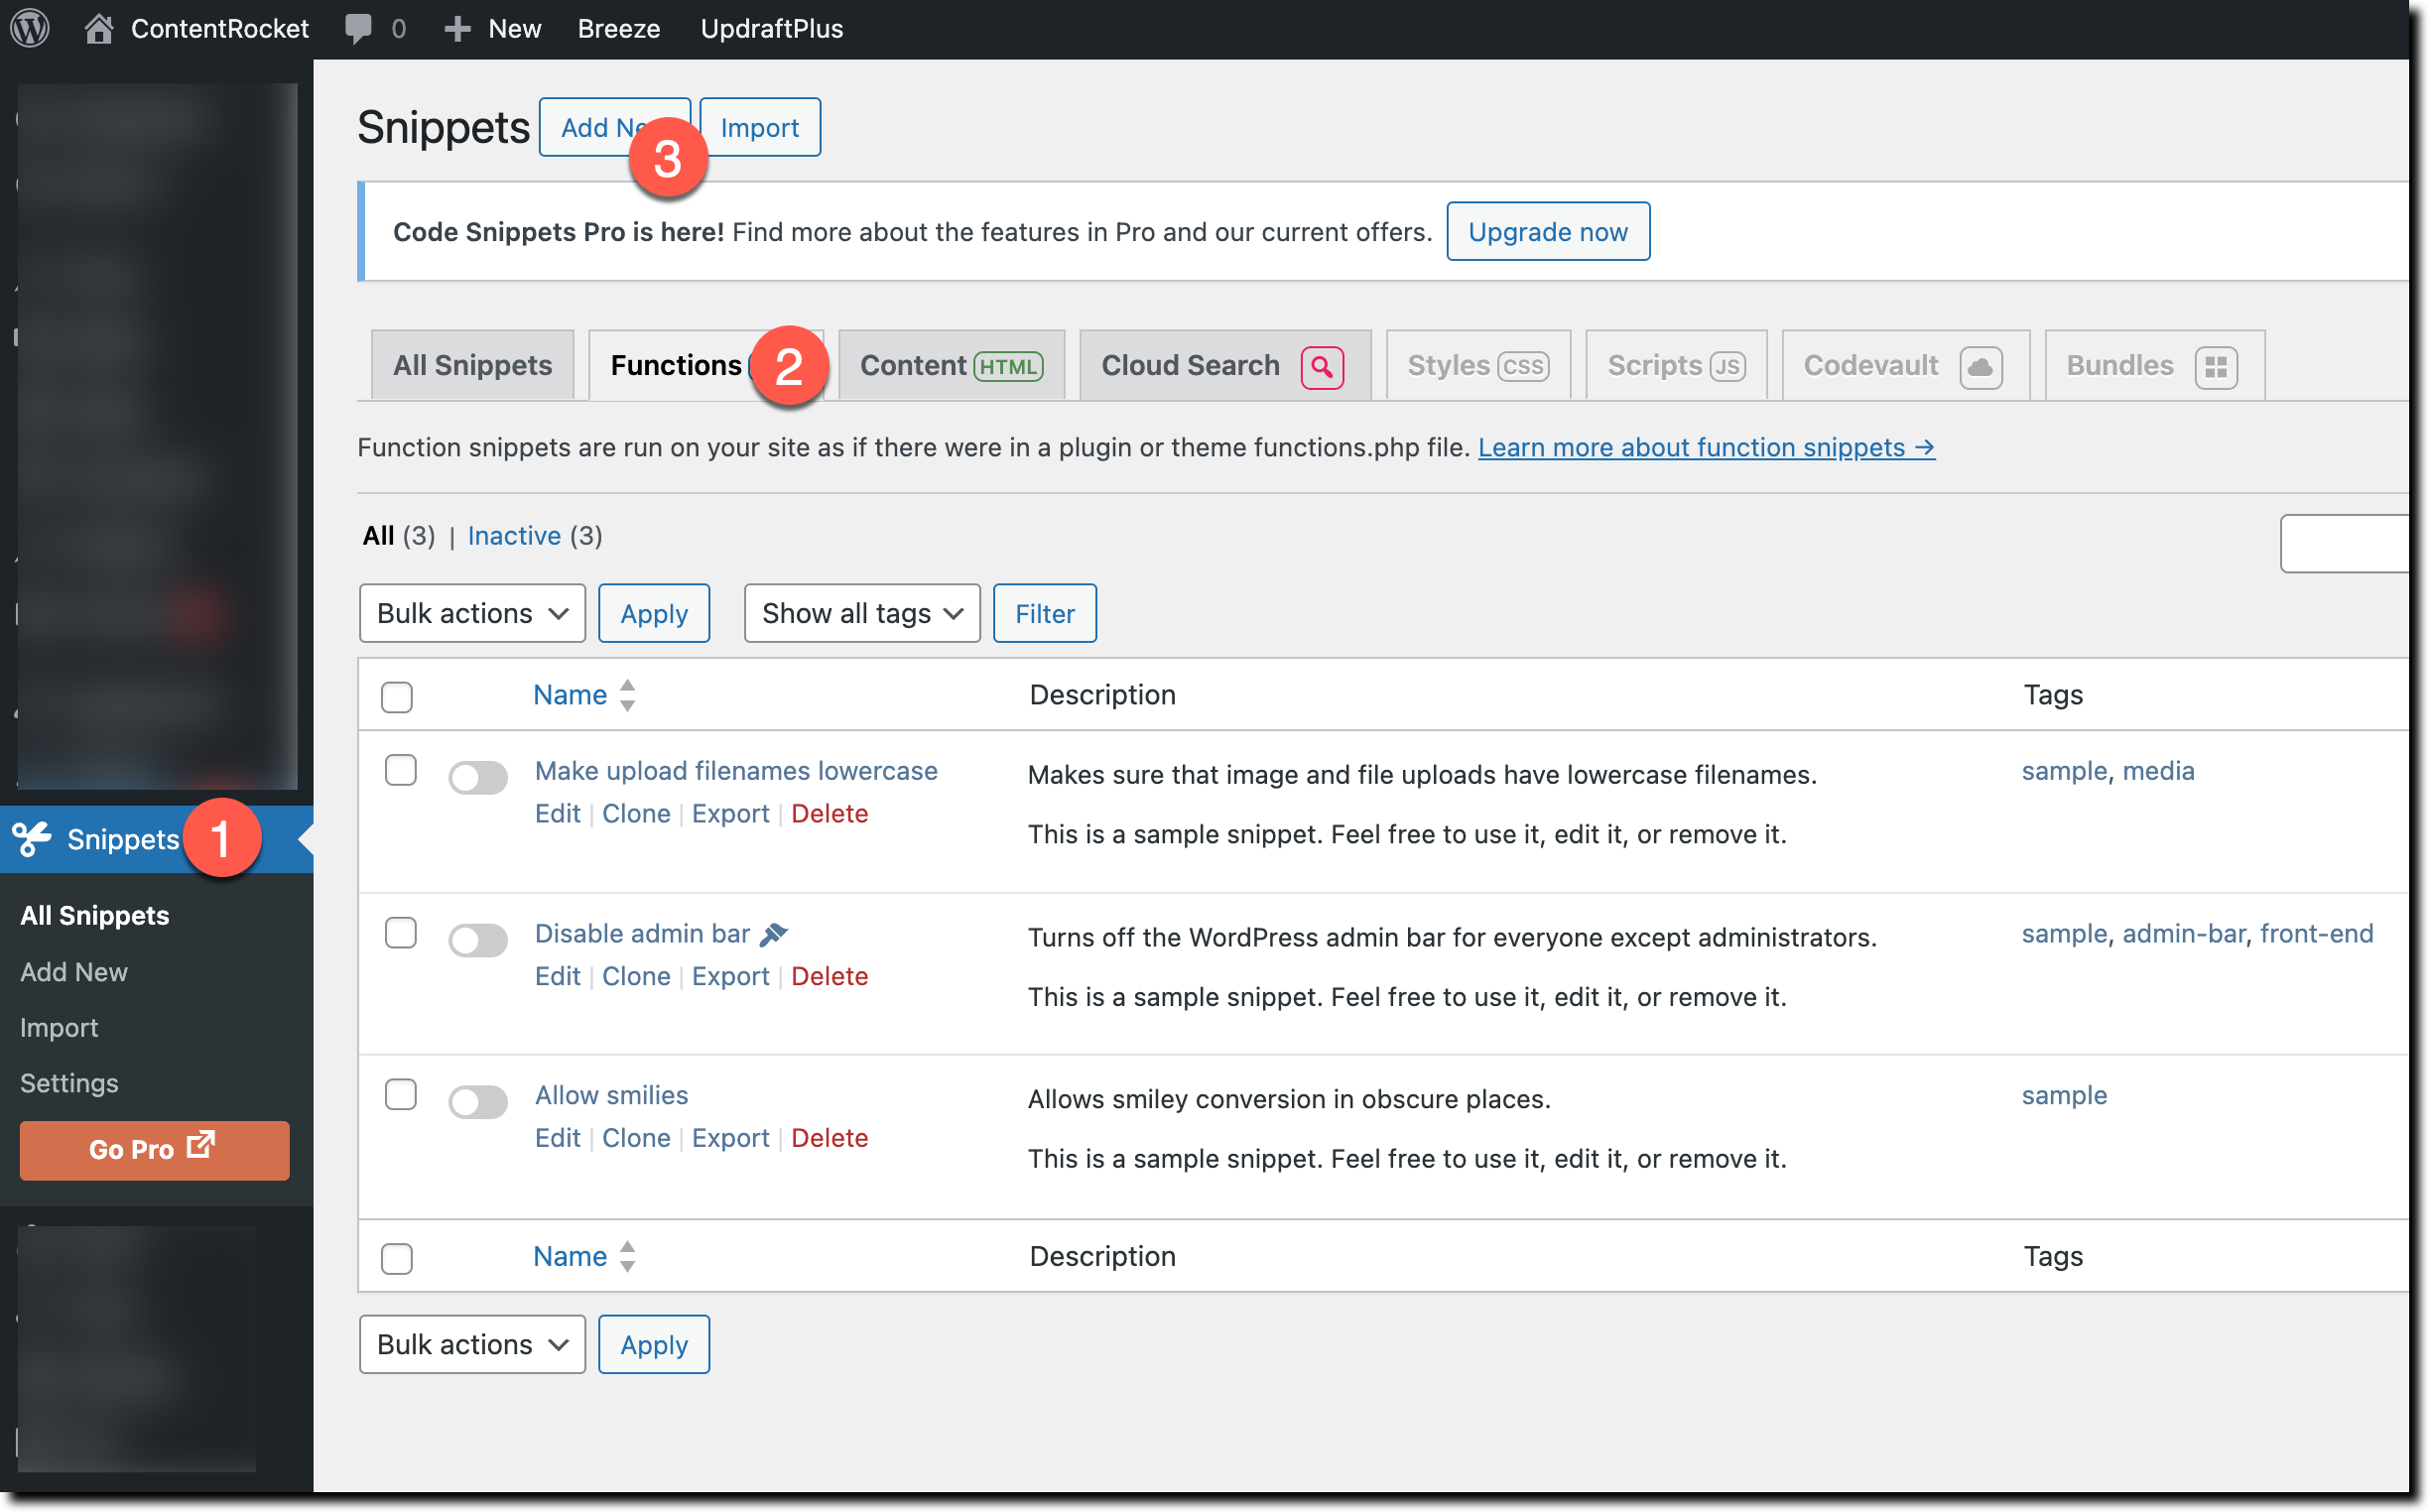
### Installing the Code Snippets plugin

* Install the "Code snippets" plugin, and hit "Activate"

<figure><img src="https://1783004979-files.gitbook.io/~/files/v0/b/gitbook-x-prod.appspot.com/o/spaces%2FIJXjOdH49mSgKizw5Kt5%2Fuploads%2FrfectJDq4jGq0vhIRP0j%2Fimage.png?alt=media&#x26;token=2cff3c94-9abf-4ac9-aea1-f87be2c9a985" alt=""><figcaption></figcaption></figure>

* Refresh the page, and hit on the left side on "Snippets" (1) and after that hit the tab "Functions" (2) and after that on "Add new" (3)

<figure><img src="https://1783004979-files.gitbook.io/~/files/v0/b/gitbook-x-prod.appspot.com/o/spaces%2FIJXjOdH49mSgKizw5Kt5%2Fuploads%2F4DU5iCviKuv7Iv5sEU1b%2Fimage.png?alt=media&#x26;token=ac75ba52-10ba-4fd7-aa72-2f74789b8483" alt=""><figcaption></figcaption></figure>

* Call the snippet e.g. "Youtube" as title and paste the script below:

```php
function yt_video_shortcode() {
    $myfield = get_field('faqvideo');
    return $myfield;
}
add_shortcode('faqvideo', 'yt_video_shortcode');

```

Or this one for Youtube, for full height:

```javascript
function yt_video_shortcode() {
    // Grab the YouTube embed code (iframe) from an ACF field named "faqvideo"
    $myfield = get_field('faqvideo');
    
    // If there's no field, return nothing
    if ( empty($myfield) ) {
        return '';
    }

    // Build the HTML output with inline <style> and a container
    $output = '
    <style>
    .video-container {
      position: relative;
      padding-bottom: 56.25%; /* 16:9 aspect ratio */
      height: 0;
      overflow: hidden;
    }
    .video-container iframe {
      position: absolute;
      top: 0;
      left: 0;
      width: 100%;
      height: 100%;
      border: 0;
    }
    </style>
    
    <div class="video-container">
      ' . $myfield . '
    </div>
    ';

    return $output;
}
add_shortcode('faqvideo', 'yt_video_shortcode');
```

* For Elementor customers, create also the following function:

```php
function faq_image_shortcode() {
    $image_url = get_field('faqimage'); // Replace 'faqimage' with the field name for your image URL
    if ($image_url) {
        return '<img src="' . esc_url($image_url) . '" style="max-width:100%;height:auto;">';
    }
    return ''; // Return empty if no image URL is found
}
add_shortcode('faqimage', 'faq_image_shortcode');
```

```javascript
function faq_download_shortcode() {
    $download_url = get_field('faqdownload'); // Replace 'faqdownload' with the actual field name
    if ($download_url) {
        return esc_url($download_url);
    }
    return ''; // Return empty if no URL is found
}
add_shortcode('faqdownload', 'faq_download_shortcode');
```

* Add this in case ACF plugin is showing: "the acf shortcode is disabled on this site":

```javascript
//add_action( 'acf/init', 'set_acf_settings' );
function set_acf_settings() {
    acf_update_setting( 'enable_shortcode', true );
}
```

* Hit "Save changes and activate"

### Styling the Blog posts (optional)

You are responsible for styling your blog posts. With ContentRocket, we only input the values into the appropriate fields. Please consult your website administrator to style the blog post as needed.

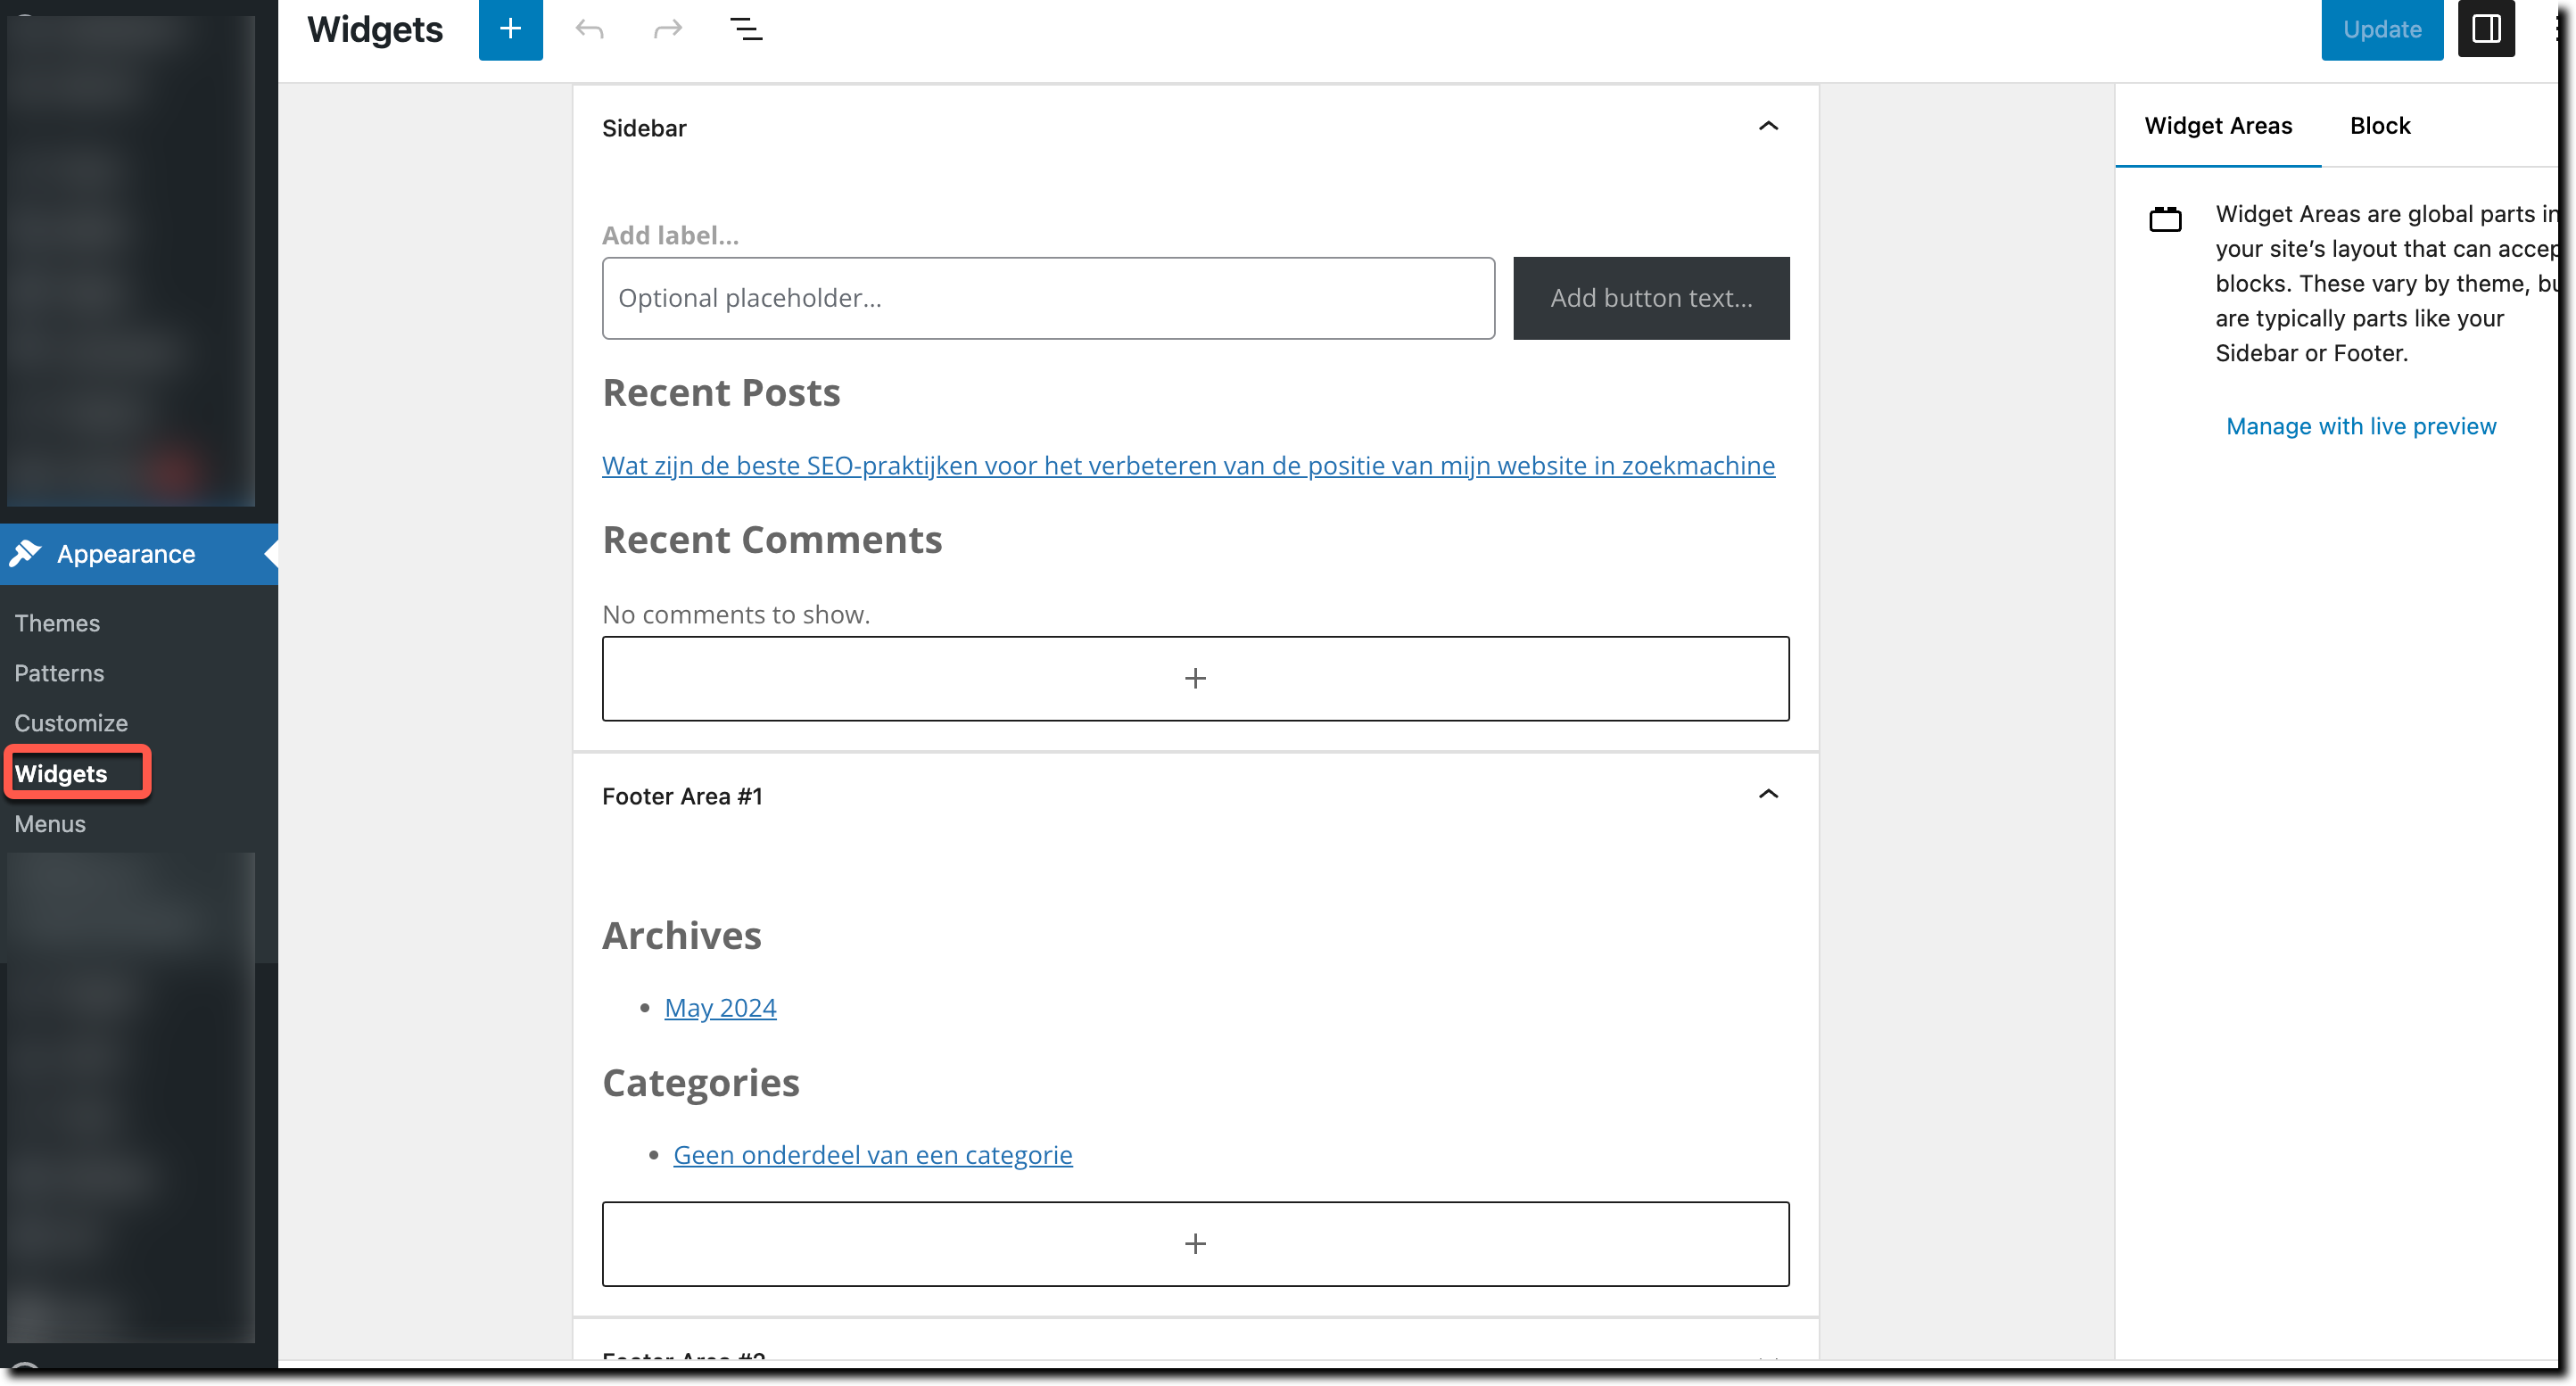
* To remove the author details, go to Appearance > Widgets:

<figure><img src="https://1783004979-files.gitbook.io/~/files/v0/b/gitbook-x-prod.appspot.com/o/spaces%2FIJXjOdH49mSgKizw5Kt5%2Fuploads%2F82JM7HuKyUg0AvdksKhu%2Fimage.png?alt=media&#x26;token=7604c2de-8eb0-4648-af1a-d945fdff26ef" alt=""><figcaption></figcaption></figure>

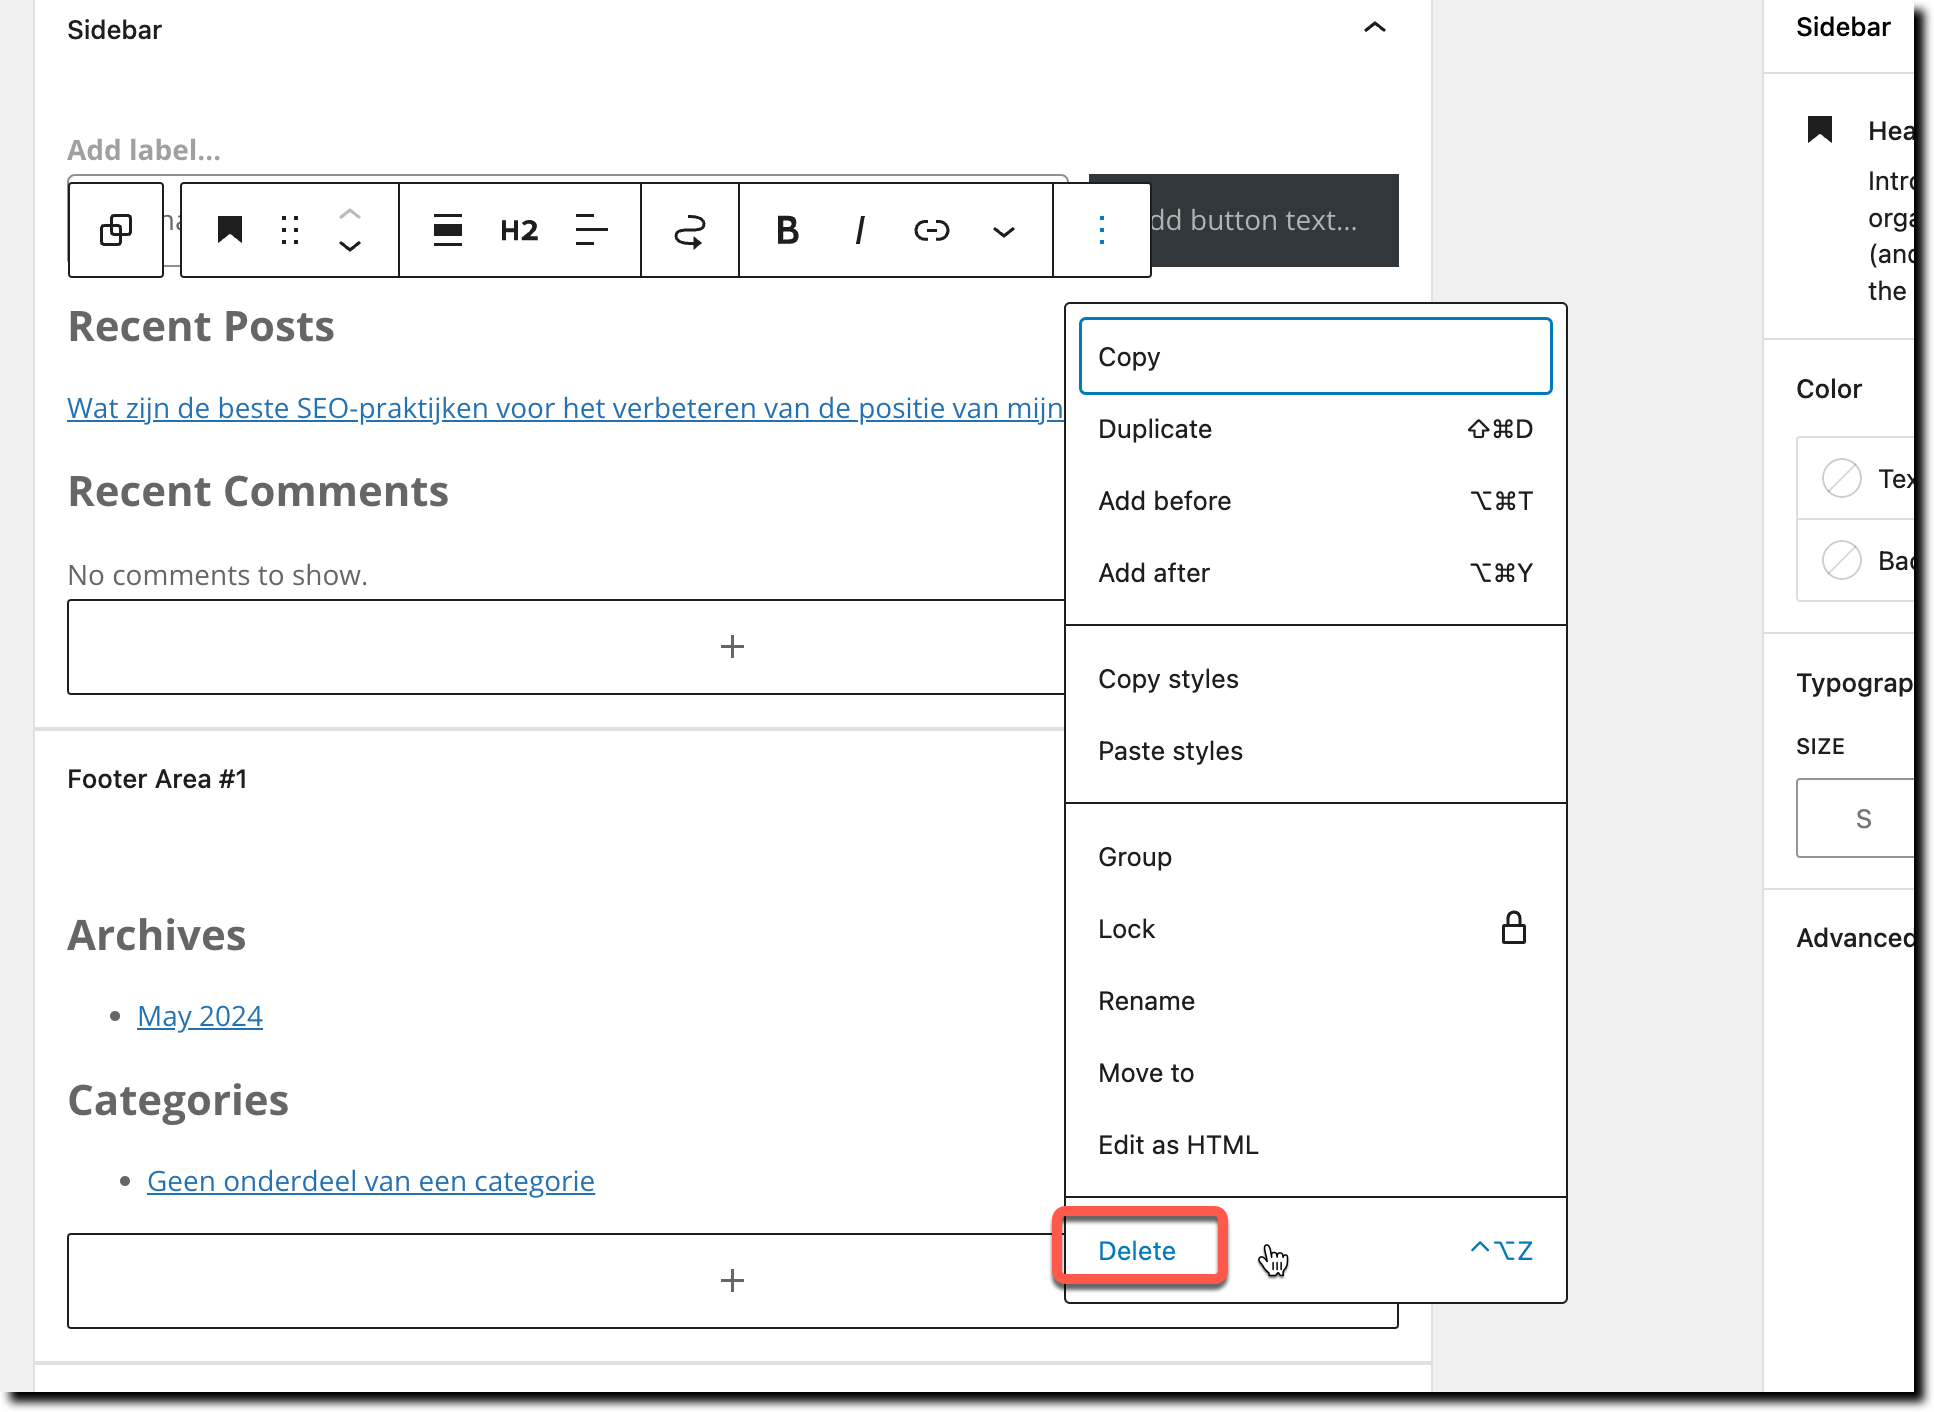
* Delete the unnecessary items:

<figure><img src="https://1783004979-files.gitbook.io/~/files/v0/b/gitbook-x-prod.appspot.com/o/spaces%2FIJXjOdH49mSgKizw5Kt5%2Fuploads%2FWfx6joPvBpX3s6BGpNJN%2Fimage.png?alt=media&#x26;token=2d0be393-b3f3-41f0-88bb-28ba7a954917" alt=""><figcaption></figcaption></figure>

Here some other tips to make the blog page better:

```
1. Remove Sidebar Widgets (Recent Posts and Recent Comments)
If you want to remove the sidebar widgets such as recent posts and comments:

Navigate to Widgets: Go to Appearance > Widgets.
Adjust the Sidebar: Find the Sidebar area and remove the widgets for Recent Posts and Recent Comments.

2. Disable the Sidebar Completely in Divi
To disable the sidebar completely in Divi for posts:

Edit the Post in Divi Builder: Open your post.
Go to Divi Post Settings: Click on the Document Settings gear icon at the top right corner in the Divi Builder.
Layout Settings: In the Divi Post Settings, under Layout, select "Fullwidth" to remove the sidebar from the post layout.

3. Globally Change Sidebar Settings
To change the settings globally across all posts:

Divi Theme Options: Go to Divi > Theme Options.
Layout Settings: Under the General tab, find the Layout settings and set the default post layout to "Fullwidth."
```
